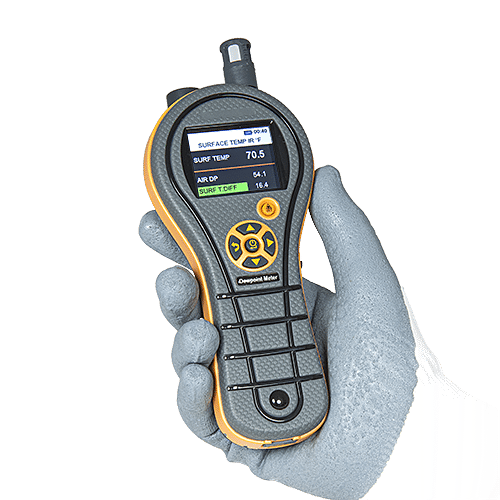
Dew Point Meter H4001 PTE(PaintTest Equipment)
ŕ¤Ă×čͧÇŃ´¨Ř´ąéÓ¤éҧ


´ŇÇąěâËĹ´SPECä´é·ŐčąŐč
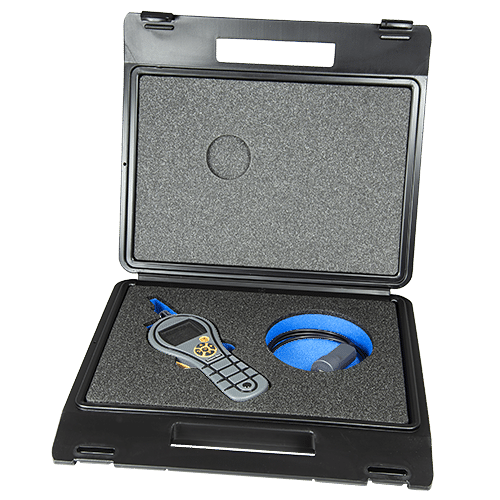
Supply
Supplied in an industrial foam-filled Carrying Case
with a Humidity Sensor and Surface Temperature
Probe.
The Calibration Certificates with traceability to
UKAS are an optional extra.
IR Based – With 12:1 (D:S) Ratio
Range -4°F to 176°F (-20°C to 80°C)
Accuracy ±3.6°F (±2°C)
- Dewpoint Meter 1–100%rh/-10 to 70°C (14–160°F). Inc Humidity Sensor
- Spare Humidity Sensor 0–100%rh/-10 to 70°C (14 to 160°F)
- Humidity Sensor Calibration Certificate
- PC Download Cable
Paint Inspection Kit
The Dewpoint Meter is also supplied in the Paint Inspection Kit. The Paint Inspection Kit contains all the equipment for the testing of blast-cleaned steel and coating inspection using the following equipment.
Testex Replica Tape / Replica Tape Gauge. Surface Profile measurement of blast-cleaned steel.
Bresle Test. Measurement of salts and corrosion products on blast-cleaned steel.
Dust Tape Test. Assessment of the quantity andsize of dust particles on blast-cleaned steel.
Dewpoint Meter. Testing for the probability of condensation on blast-cleaned steel.
Wet Film Gauge. Wet film thickness measurement of the coating.
Coating Thickness Meter. Dry film thickness measurement of the coating.
Brightness
Select the display brightness by using the up and down Arrows. When selected press the On button to save.
Buzzer
Select the buzzer to be on or off. When selected press the On button to save.
Calibration
This function is for Paint Test Equipment use only.
Logging
The logging will allow you to set a logging period and a job number so that measurements can be stored for PC download.
Select the Start and Stop by using the up and down arrows to change numbers and the side arrows to move through the numbers, then press the On button and the display will allow you to set the Log Interval and Job Number using the same arrow buttons. When selected press the On button to save.
The memory can be cleared from all measurements by selecting Clear Data using the up and down arrows. When selected press the On button to clear.
USB Connection
Measurements can be stored in the memory by pressing the right arrow button for one second until RECORD SAVED appears.
Select File Viewer by using the up and down arrows. When selected press the On button to save. All stored measurements can be downloaded to a computer directly into Excel.
Connection is made using the optional USB PC Download Cable to the download socket on the Dewpoint Meter and the USB port on the computer. Ensure the Dewpoint Meter is switched off when connecting the cable. Switch the Dewpoint Meter on and USB Connected will show on the display. Locate the HygroMaster storage device on the computer and view the files.
When stored readings are in Excel using the Surface Temperature Probe Function the results are shown as follows:
Measurement 1: Surface Temperature
Measurement 2: Air Dewpoint
Measurement 3: Surface Temperature Difference
The memory can be cleared from all measurements by selecting Clear Data under the Logging Menu Feature.
Language
Language options of English, Norwegian, French,German, Swedish, Spanish, Italian and Dutch can be selected by using the up and down arrows. When selected press the On button to save.
Units
Metric or imperial measurements can be selected by using the up and down arrows. When selected press the On button to save.
Custom
Customise the display with up to four different measurement types by using the up and down arrows. When selected press the On button to save. When Custom is selected under the Psychometrics Menu Function the display will show the selected measurement types.
Date and Time
Set the Date and Time so when readings are stored for download to a PC the downloaded readings will show the date and time.
Select the Date by using the up and down arrows to change numbers and the side arrows to move through the numbers, then press the On button and the display will allow you to set the Time using the same arrow buttons. When selected press the On button to save.
Auto Off
Select the number of minutes for the instrument to automatically switch off by using the up and down arrows. When selected press the On button to save.


 Dew Point Meter Model PT-DPM