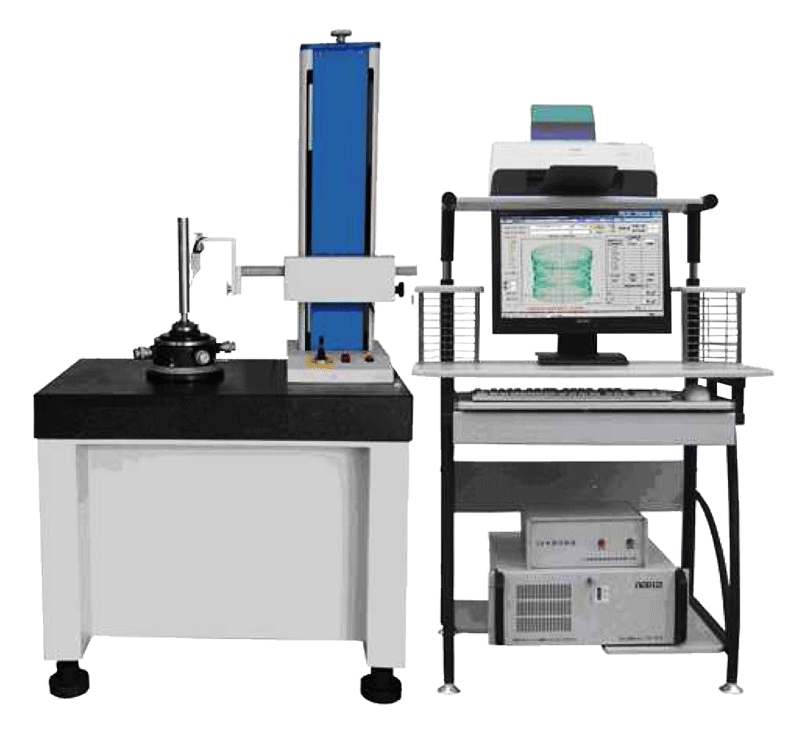
Roundness- Cylindricity Measuring Machine ŕ¤Ă×čͧÇŃ´¤ÇŇÁˇĹÁ
ŕ¤Ă×čͧ·´ĘÍş¤ÇŇÁˇĹÁ ˘Í§ÇŃĘ´Ř ·ŐčĽĹÔµ˘Öéąŕľ×č͵éͧˇŇĂ µĂǨĘÍş ¤ÇŇÁˇĹÁ ËĂ×͡ŇĂŕÂ×éͧČŮąÂě µčҧć


Introduction
This series instrument is high precision roundness-cylindricity measuring instrument. It is suitable for measuring various kinds of regular or irregular ring shape work piece, as roundness, cylindricity, straightness, concentricity, co-axiality, flatness, parallelism, squareness, surface waviness (Wc, Wp, Wv,Wt, Wa, Wq), frequency spectrum analysis, wave height analysis, eccentricity, Bending, discontinuous surface measurement, round out etc. It is widely used in machinery (motor shaft, motor commutator, gear, crankshaft, motor shaft, pump nozzle, piston, piston pin, etc.), precision tools, dies, precision electronics, auto parts, motorcycle fittings, compressor, bearings and other industries. It also applies to research institutes, universities, institutions and enterprises calibration lab.
Below sketch shows the configuration of the instrument, that is for your reference only.
The accuracy of this series instrument is divided into different grade, the qualification, using, and evaluation please refer to the technical parameters accordingly.
Specification list
| Model |
ŕ¤Ă×čͧ·´ĘÍş¤ÇŇÁˇĹÁ RC30H |
ŕ¤Ă×čͧ·´ĘÍş¤ÇŇÁˇĹÁ RC60H |
ŕ¤Ă×čͧ·´ĘÍş¤ÇŇÁˇĹÁ RC35 |
ŕ¤Ă×čͧ·´ĘÍş¤ÇŇÁˇĹÁ RC65 |
| Radial Accuracy of spindle |
±(0.025+5H/10000)um |
±(0.0125+5H/10000)um |
±(0.035+5H/10000)um |
±(0.020+3H/10000)um |
| Axial Accuracy of spindle |
±(0.03+6X/10000)um |
±(0.03+4X/10000)um |
±(0.03+6X/10000)um |
±(0.02+4X/10000)um |
| Dia. Of work plate and Load capacity |
φ150mm(Extendable) |
φ220mm(Extendable) |
| Load Capacity |
20kg |
40k |
| Work plate adjustable range |
Ecentici±2mm, Horizontal adjustable: ±1° |
| Measured Max. dia |
250mm(Extendable) |
| Straightness of vertical rail moving |
0.5чm/100mm |
0.35чm/100mm |
0.5чm/100mm |
0.35чm/100mm |
| Parrallelism of the vertical rail to rotary |
2чm/400mm( generatrix ) |
| Measuring height |
300mm(Extendable) |
| Max. Measured Depth |
Standard styli:100mm(Dia.>360mm),40mm(dia:12mm-36mm),Optional holder(500mm) |
| Sensor Parameter |
Resolution:0.01µm, Range::500µm( radius deviation), Program to enlarge, Gaussian filter, Titanium rod, Ruby tip styli |
| Rotation speed |
5rpm |
| Data acquisition |
Imported high precision encoder, 3600/r, Industrial automation computer, Settable cross-section for cylindricity measurement |
| Standard accessories |
Hemisphere glass, Standard cylinder , Ellipse Gauge,etc |
| Options |
Ultra thin precision scroll chuck, thermal printer, ruby tip styli etc. |
| Dimension |
L×W×H:750mm×470mm×1250mm |
L×W×H :800mm×500mm×1450mm |
| Power |
220-240v AC, 50HZ, Independent ground, 450W |
| Air Supply |
0.4 Mpa, 0.1mm^3/min |
| Environment |
Tem: 10-30°C, RH:20-80%, shock free |
| Models |
ŕ¤Ă×čͧ·´ĘÍş¤ÇŇÁˇĹÁ RC90 |
ŕ¤Ă×čͧ·´ĘÍş¤ÇŇÁˇĹÁ RC95 |
ŕ¤Ă×čͧ·´ĘÍş¤ÇŇÁˇĹÁ RC120 |
ŕ¤Ă×čͧ·´ĘÍş¤ÇŇÁˇĹÁ RC125 |
| Radial Accuracy of spindle |
±(0.035+5H/10000)um |
±(0.020+3H/10000)um |
±(0.035+5H/10000)um |
±(0.020+3H/10000)um |
| Axial Accuracy of spindle |
±(0.03+6X/10000) um |
±(0.02+4X/10000) um |
±(0.03+6X/10000) um |
±(0.02+4X/10000) um |
| Dia. Of work plate |
φ220mm(Extendable) |
φ320mm(Extendable) |
| Load Capacity |
80kg |
120kg |
| Work plate adjustable range |
Ecentici±3mm, Horizontal adjustable: ±1.5° |
| Measured Max. dia |
400mm(Extendable) |
500mm(Extendable) |
| Straightness of vertical rail moving |
0.5чm/100mm |
0.35чm/100mm |
0.5чm/100mm |
0.35чm/100mm |
| Parrallelism of the vertical rail to rotary |
2чm/400mm ( generatrix ) |
1.5чm/650mm ( generatrix ) |
2чm/650mm ( generatrix ) |
1.5чm/650mm ( generatrix ) |
| Max. Measured Depth |
450mm |
650mm |
| Sensor Parameter |
Standard styli:100mm(Dia.>360mm),40mm(dia:12mm-36mm),Optional holder(500mm) |
| Models |
ŕ¤Ă×čͧ·´ĘÍş¤ÇŇÁˇĹÁ RC65 CNC |
ŕ¤Ă×čͧ·´ĘÍş¤ÇŇÁˇĹÁ RC95 CNC |
ŕ¤Ă×čͧ·´ĘÍş¤ÇŇÁˇĹÁ RC125 CNC |
| Radial Accuracy of spindle |
±(0.035+5H/10000)um |
±(0.020+3H/10000)um |
±(0.020+3H/10000)um |
| Axial Accuracy of spindle |
±(0.03+6X/10000)um |
±(0.02+4X/10000)um |
±(0.02+4X/10000)um |
| Dia. Of work plate |
φ220mm(Extendable) |
φ320mm(Extendable) |
| Load Capacity |
80kg |
120kg |
| Work plate adjustable range |
Ecentici±3mm, Horizontal adjustable: ±1.5° |
| Measured Max. dia |
400mm(Extendable) |
500mm(Extendable) |
| Straightness of vertical rail moving |
0.5чm/100mm |
0.35чm/100mm |
0.5чm/100mm |
| Parrallelism of the vertical rail to rotary |
2чm/400mm
( generatrix )
|
1.5чm/650mm
( generatrix )
|
2чm/650mm
( generatrix )
|
| Max. Measured Depth |
450mm |
650mm |
| Sensor Parameter |
Standard styli:100mm(Dia.>360mm),40mm(dia:12mm-36mm),Optional holder(500mm) |
| Measurement |
Measurement |
.gif)
|
1—Stand
2—Filter
3—Granite desk
4—Precision scroll chuck
5—Centering and tilting adjustable work plate
6—Sensor
7—Column
8—Air-floating spindle
9—Coupling
10—Rotary encoder
11—Motor
12—The oil-water separator |

Roundness Cylindricity Measuring Machine, ŕ¤Ă×čͧÇŃ´¤ÇŇÁˇĹÁ, ˇŇĂÇŃ´¤ÇŇÁˇĹÁ, ÇÔ¸ŐˇŇĂÇŃ´¤ÇŇÁˇĹÁ, ÇÔ¸ŐÇŃ´¤ÇŇÁˇĹÁ, Roundness Tester ¤×Í, ŕ¤Ă×čͧÇŃ´¤ÇŇÁˇĹÁ˘Í§ŞÔ鹧ҹ, ŕ¤Ă×čͧÇŃ´¤ÇŇÁˇĹÁÁŐˇŐ誹Դ,ŕ¤Ă×čͧroundness, roundness ¤×ÍÍĐäĂ


 Roundness Tester ŕ¤Ă×čͧ·´ĘÍş¤ÇŇÁˇĹÁ Model SDTP-Series (SUNPOC)


.gif)
